While content is king, images ensure that this king rules. The first reason images are crucial is their influence on readability and behavioural factors on the website.
Suppose you write a long-read. If you neglect visuals, no one will wade through the wall of text regardless of its value. As a result, visitors will bounce, which will be a negative indicator for search engines.
If you present a how-to guide to your readers, it’ll be convenient to see the steps. Such content has a higher chance to spread virally and get backlinks for its information and screenshots. It’s another SEO bonus.
Or let’s take online stores. Who will buy something if there are no pictures? So, if you still doubt whether you need images, the answer is always “yes,” no matter which business you represent.
Images speak louder than a hundred words. Pictures not only bring a page to life, but they also help your website rank higher in search engines.
However, you need to know how to optimize them SEO-wise. And that’s where image SEO comes into play. This article discusses how to optimize media for SEO and offers some tips on using images to deliver the greatest user experience.
Contents
Image SEO Explained and Why You Need It
When it comes to image SEO, the first thing you may recollect is optimizing alt tags, but you can do a lot more. It takes more than uploading large files and giving indistinctive file names. Image SEO is the process of optimizing your images for search engines by using:
- a relevant alternative text (alt-text);
- proper captions;
- appropriate file sizes;
- consistent file names;
- among other things.
Image SEO makes your material easier for search engine crawlers to understand, which improves its SEO on search and image result pages and makes your site more discoverable.
As a result, image search increases organic traffic to your website. What should you do to rank higher in image searches? Let’s proceed with the tutorial.
8 Tips to Increase the Visibility of Your Images
Tip 1: Select the Most Appropriate File Type
The most common file types for images are:
- JPEG, a fantastic choice for larger pictures since it provides good color and clarity with a small file size;
- PNG produces higher-quality photos but has a greater file size;
- WebP provides top-notch outcomes with lesser file sizes (you may convert your image to WebP using programs like Squoosh);
- SVG is appropriate for logos and icons (you can use CSS or JavaScript to manage images in SVG format, for example, to resize them without losing quality);
- GIF, used for moving images.
Each format differs in compression technique and final image size. Your choice influences SEO in the following way:
- Images are the most significant contributor to overall page size, increasing page load time.
- The time it takes for a page to load is a ranking factor on desktop and mobile.
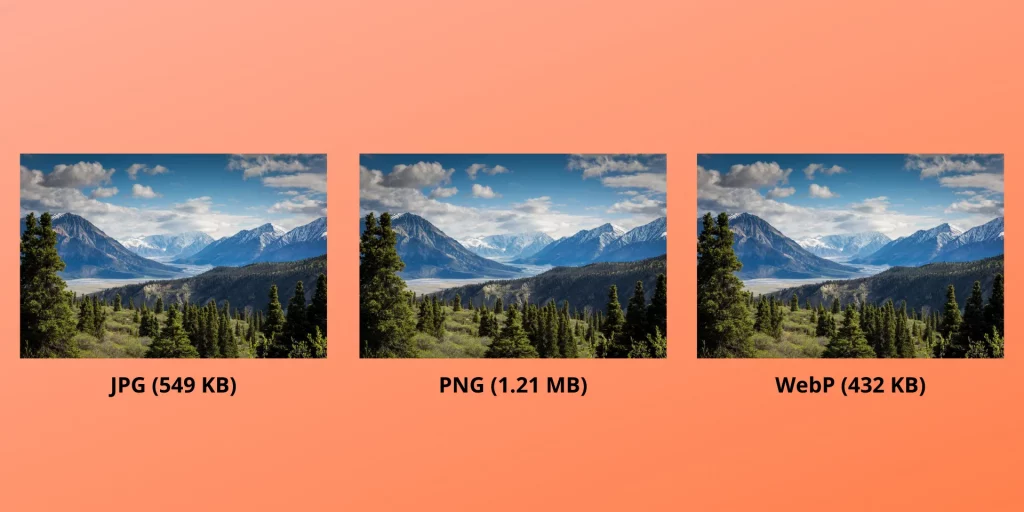
Select the most appropriate file type for each image to balance the best compression without the quality loss. Below you can compare file sizes of the same picture with identical dimensions.
The only difference is in the format. As you can see, WebP is a clear winner, but it reduces the image quality, which may be crucial for professional portfolios.
Tip 2: Compress Images to Make Them Load Faster
The next thing you can’t ignore is image compression. Why should you include it in your website optimization plan? It makes your web pages load faster, which improves the user experience and helps your website rank higher in SERP.
How can you compress images? Use a tool like Compress JPEG or similar. Aim for a file size of less than 100 KB, which is ideal in most cases.
Note that Google doesn’t consider the size of each image but rather the overall page size. So you can go further and reduce the picture to 30-50 KB if it doesn’t spoil the quality too much. It allows you to keep another image 30 KB larger to preserve its quality, for example, if it contains words that you shouldn’t blur.
Tip 3: Establish Dimensions and Resize Images to Fit Your Website
Defining image dimensions takes place in the source code. It’s essential for AMP and PWA, such as in the process of Magento PWA development. Even if you don’t use either, specifying the width and height is still a good idea to improve the user experience.
What happens when you ensure that every image and video element has width and height attributes? The browser understands how much space to set aside for the component. It prevents the unpleasant moving of content, as browsers size images before the CSS loading.
When you define image dimensions, you improve the Cumulative Layout Shift (CLS) metric. As a result, you achieve better Core Web Vitals scores.
The following step concerns keeping your images in line with the website dimensions. Here is how the Explore Keywords blog looks on my screen:
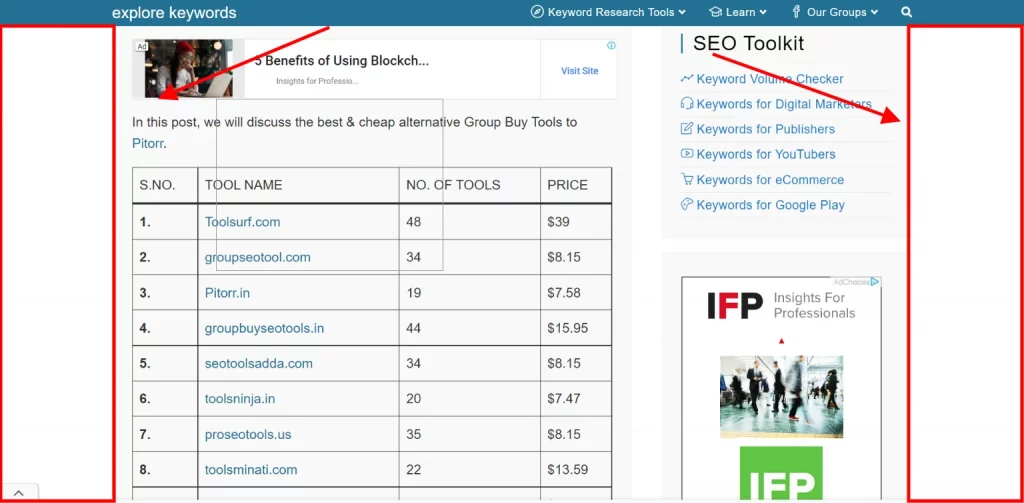
Do you see these white space sections on both sides? It happens due to the blog content width. It’s 964 px maximum, so the images will always be of this width regardless of screen size.
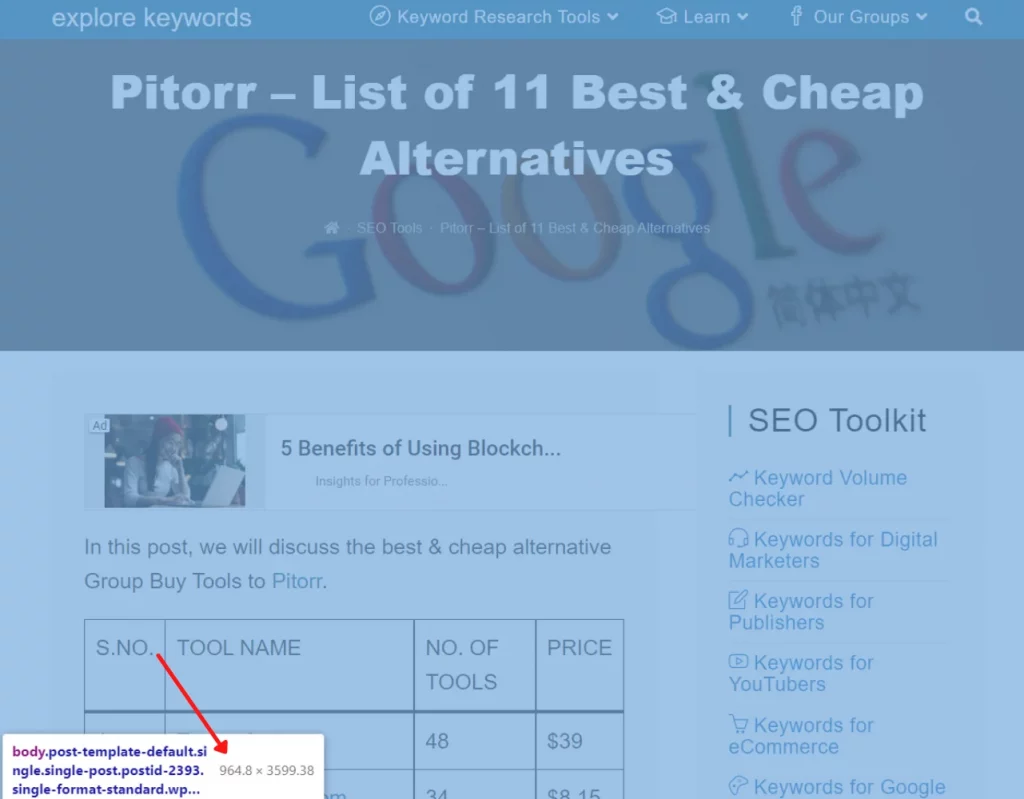
If you upload larger file size, the browser will have to download the entire thing. To put it another way, it will have to do the heavy lifting and load 6000 px, even if the image will be displayed at 964 px. That takes a long time.
The way out is to resize and upload images at the maximum width needed. Note that it may not be 964 px. Determine your website’s general design to know what dimensions to use. You may achieve this by looking through your CSS.
Pay attention to this factor if you employ a responsive design because your website may be wider than needed on smaller devices than on larger ones.
Tip 4: Create SEO-Friendly Alt Text
What is alt text? It’s a text description for each illustration. When a picture fails to load, an image box appears with the alternative tag in the upper left corner.
Alt text aims to make images more accessible to the blind and visually impaired when they use screen readers. In fact, the American Disabilities Act requires adding alt text.
It also helps convey information when a user turns off images in the web browser or when the Internet connection is poor. That is, when the image isn’t available, a person may guess what it conveys.
Alt text looks like this and is part of the HTML code within an image tag:
<img src="https://example.com/ad-blocker-stats.jpg" alt="Data sharing for reason consumers use ad blockers" />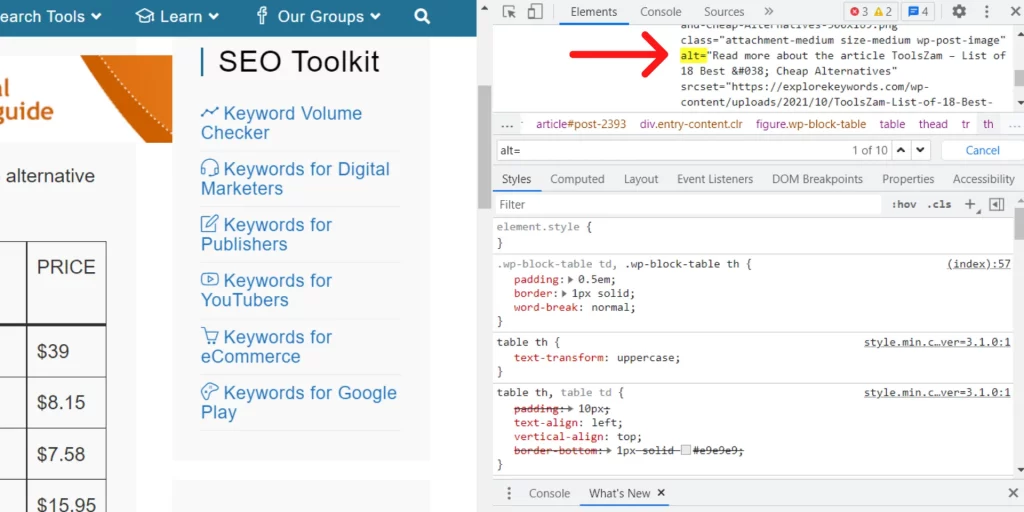
Proper alt tags benefit your overall on-page SEO strategy:
- Alt text can act as an anchor text to connect the image to a separate page on the site.
- Write alt text for every image and include the SEO keyword or phrase if relevant.
Connecting keywords with images can help your website obtain better search engine rankings as Google can better understand the picture’s subject matter. This data points at the best visual to return in response to a user’s inquiry.
Tip 5: Modify File Names, Captions, and Titles
Successful image SEO is impossible without descriptive, keyword-rich file names. Like alt text, file names inform Google and other search engine crawlers about the image content.
If you upload photos from cameras or take screenshots, the files usually go something like “IMG_270619”. Can this name make sense to Google? Not at all.
Replace the default file name with a new one to help search engines comprehend your image and boost SEO value.
While it may take some time to rename your media library, customizing the default image name is always a good idea. For example, consider the following image of candles:

You may just call it “candle,” but if you sell candles online, you could call each image “candle-1,” “candle-2,” and so on. But to get the most out of image SEO, title it more precisely. For example, “heaven-scent-candle”, indicating the product category.
Speaking of title tags, you can make them SEO-rich by adding keywords. You may have noticed the title text when hovering over an image in some browsers. This tooltip sometimes repeats the alt text, while some people omit it entirely. Although it isn’t as crucial as the alt tag, it is useful in terms of SEO and should be utilized.
The same applies to captions. Some websites can do without captions if the page context assists readers in comprehending what the image depicts. For example, if you accompany each image in your blog post with an explanation.
But what if you have numerous images, such as a portfolio website? Consider using captions to give visitors a better understanding of what they see.
Tip 6: Pay Attention to Image Structured Data
Structured data, or schema markup, deals with rich results in search engines. Adding it can help you display your photos in SERP and make your link more illustrative than regular results.
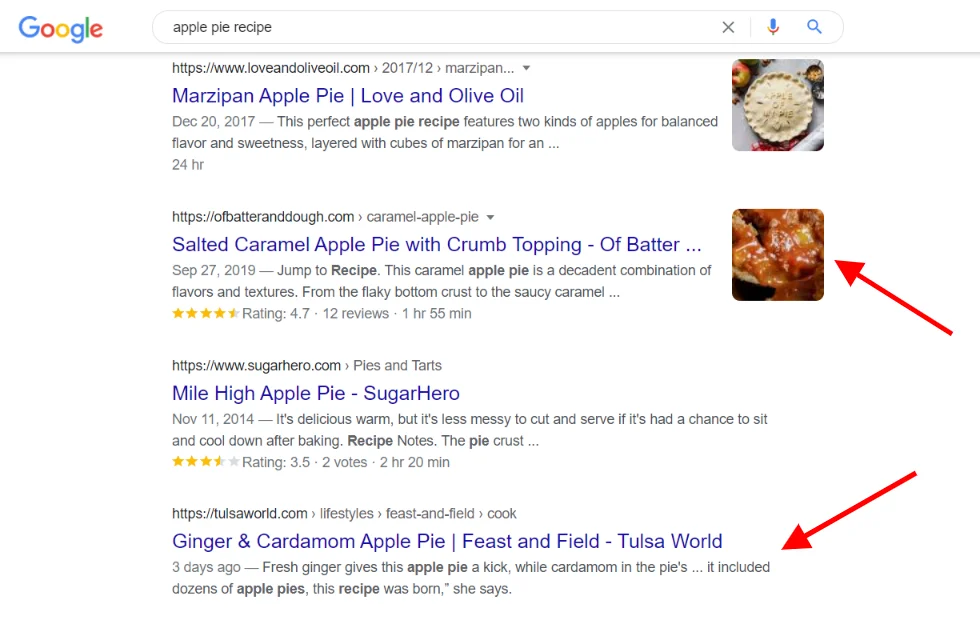
Google claims structured data doesn’t boost your page rankings. However, it provides its advantages. Rich snippets better attract organic traffic as users quickly evaluate whether the page is relevant to their request.
You can also get a badge on the image with the help of schema markup. Let’s take recipes as an example. If you provide structured data to your pictures, this badge in image search will indicate that the photo is part of a recipe, as in the screenshot below.
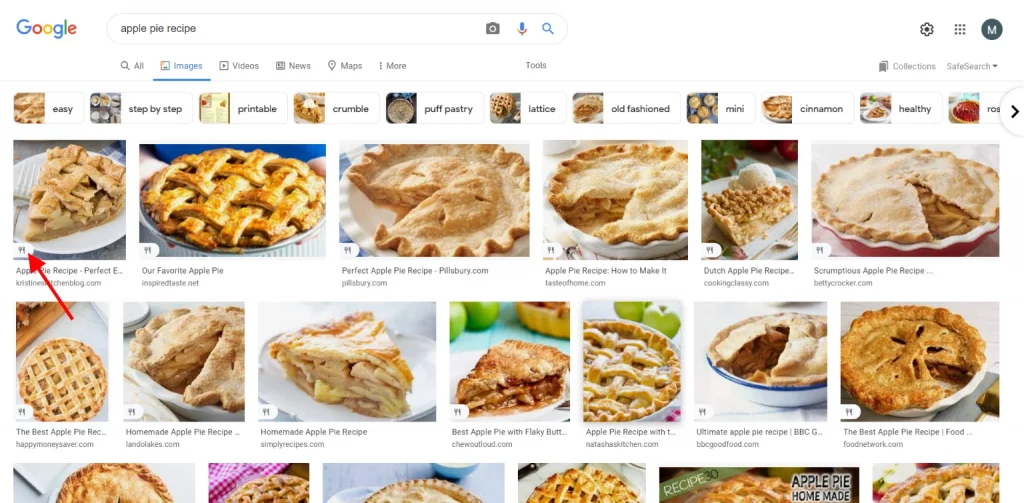
The types of structured data on Google Images include:
- products;
- recipes;
- videos;
- GIFs.
Some of the standards to make your images appear rich in image search include:
- checking whether Google Images support the file format;
- ensuring that the image is crawlable and indexable;
- etc.
How can you streamline this process? Utilize plugins such as Yoast SEO. It automatically adds the correct structured data to your pictures, such as your logo or the images on how-to pages.
The plugin analyzes pages to find at least one relevant image. It adds them to the structured data network, which helps to present your page to search engines accurately.
Tip 7: Add Images to an Existing Sitemap or Create a New One
What is an image sitemap? It contains the URLs of all images on the website. A sitemap improves the chances for your pictures to appear in search results. Google recommends two ways to help search engines find your images:
- adding images to an existing sitemap;
- creating a separate sitemap just for pictures, which is a better option.
When is a sitemap useful? When Google can’t crawl images, such as those retrieved using JavaScript forms.
Here’s an example sitemap with two images from Google documentation:
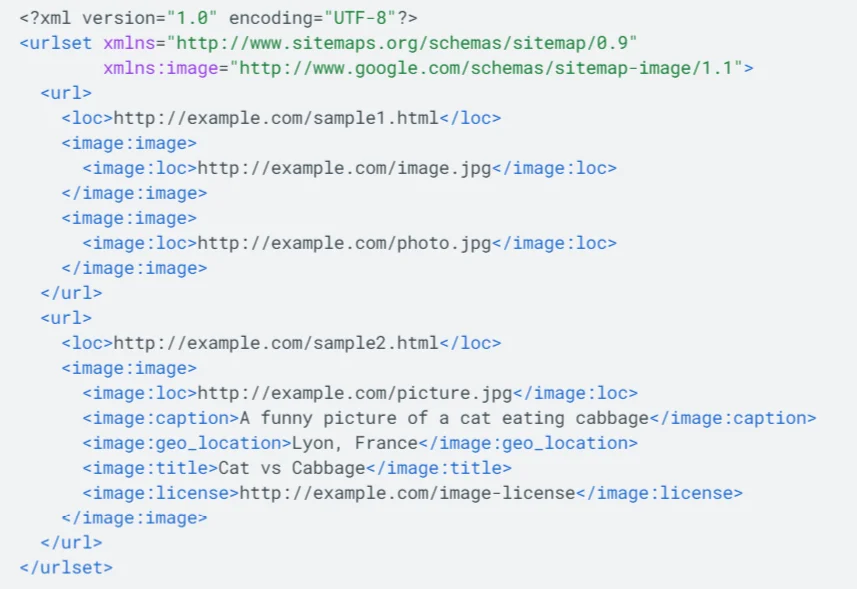
If you want to automate sitemap creation, employ tools like Angeldigital.Marketing (which is free). You enter a URL and get a ready-made image sitemap.
Tip 8: Leverage a CDN to Host Your Images
Using Content Delivery Networks (CDNs) is one of the site speed optimization strategies. Most websites employ a single server to host all their files, including images. What are the consequences of this?
Suppose your server is located in Australia. If someone accesses your website from this country, your photos will load fast as they’re kept nearby.
But in the case of visitors from the United States, images “travel” a long distance to reach them. As a result, it slows down your website loading time.
How can CDNs solve this issue? They cache your data across a global network of servers, so images load from the nearest server.
Popular CDNs include:
- Cloudflare;
- Fastly;
- KeyCDN;
- Amazon CloudFront;
- to name a few.
Note that if you enable a CDN, it will have a xyz.cdnprovider.com URL. It’s not the perfect scenario due to the following reasons:
- Your images belong to a different domain. So if someone takes your picture and provides credit, they link to the CDN, while you could have got a valuable link.
- It’s harder to switch to another CDN provider, as you’ll have to change or redirect all image URLs.
The solution is to create a CNAME (a canonical name) record. It replaces the CDN provider’s URL (xyz.cdnprovider.com) with an alias such as cdn.yourdomain.com.
Major Takeaways
Do you want to make your images SEO-friendly? If yes, you need to complete the above image optimization steps before uploading your visuals to the website.
Start with analyzing whether the image is relevant to the page. What’s the point of optimizing images that won’t attract targeted traffic and won’t benefit users?
Pay attention to Alt tags as well. Define what’s in the image so that both search engines and humans can understand it. The more accurately you describe the picture, the more meaningful it is to search engines.
Other important takeaways include:
- selecting the appropriate file format;
- reducing the file size to make the website load faster;
- ensuring your image matches your on-page SEO features (keywords, structured data, etc.);
- creating an image sitemap or including pictures in the current sitemap for better crawlability;
- enabling a CDN.
Take image optimization seriously. As voice search technology advances, media is becoming increasingly important, and following these instructions will help your entire website to succeed in SEO.

